
Sexy In Red Supplies
Plugin Used: VM Natural, DSB Flux and they both can be found on the right side of this page under " Plugins Used "
Paste frame into your psp
Copy - paste the rose and move towards the right
Image - free rotation - Direction- Right, Degrees - 90 and make sure the
" Rotate single layer around canvas center" is checked
Give your rose a drop shadow using these setting
V-3, H-3, Opacity-35, Blur-3,
Copy - paste the booty tube and move it below between the gold square and the black box
Your layers should look like below
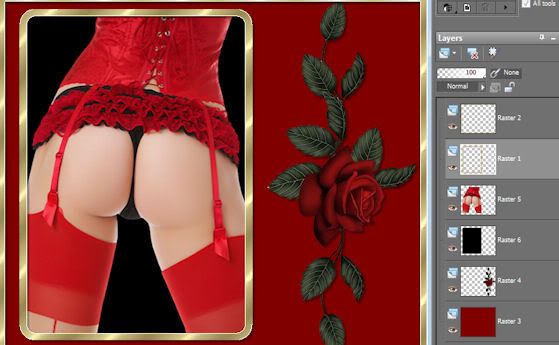
Copy - paste your double diamond hearts and move to the upper left......or you can move them where
ever you wish
I used the single diamond heart to place over the roses. but have fun and move them where you wish.
Merge all your layers down EXCEPT your diamond hearts layers. You will need to merge all of those down
upon their own seperate layer
So you should have 2 layers now.....your diamonds and your tube,frame,rose etc.
Duplicate your diamond layer twice so that you have 3 layers
Acitvate your first layer
Effects - plugins- dsb flux - Bright Noise Filter Options and set it on " Mix" Intesity " 60 "
Next activate your middle diamond layer and repeat this step
Finally activate your 3rd diamond layer and repeat
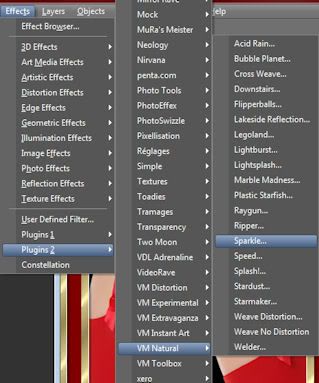
Effects - plugin - VM Natural - Sparles, and use these settings
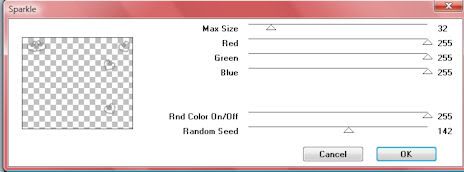
Activate your middle layer and using the same settings as above, except you will want to change
the random speed to 156
Activate your 3rd diamond layer and use the same settings but change the random speed to 166
Duplicate your frame layer twice so that you have 3 layers
Move one layer under each diamond layer and merge those two down
You should now have 3 layers of your frame and diamonds
Be sure you put your watermark on it if you haven't already. and make sure it has 3 layers to merge down
onto each layer.
Activate your bottom layer
Copy
Take To Animation
Paste as New Animation
Back To PSP
Activate your middle layer
Copy
Take to animation
Paste - as after current frame
Back To PSP
Activate your top layer
Copy
Take to animation
Paste - as after current frame
View your design
And save as gif
Supplies Here
Plugin used is VM Natural and you can find it in the Plugin Section to the right
Open up your frame in psp
Give it a drop shadow using these settings V-4, H-4, Opacity 40, Blur-4
Then give it another drop shadow using these settings V- -4, H- -4, Opacity-40, Blur-4
Copy - paste your woman tube into your frame and make sure it's centered, And she is the second
layer from the top, right under the frame part.
Copy - paste your penandink and move to the lower right
Give it a drop shadow using these settings V-4, H-4, Opacity 40, Blur-4
Effects - edge effects - enhance
Copy - paste your red envelope and move it to the bottom right, make sure its behind the penandink
Copy - paste your corner rose into your bottom left
Duplicate - Flip
Duplicate - Mirror
Duplicate - Flip
You should now have roses on all 4 corners, make sure your rose corner at the bottom right is in front of your envelope
and penandink
Merge all 4 rose corners down onto each other
Copy - paste your Gold n Diamond and move to the upper left
Duplicate - mirror
Merge those two layers together
Duplicate - flip
You should now have the Gold n Diamond in each corner
Merge the 2 layers down onto each other
Copy - paste your diamond into your frame and put them where ever you like, then merge
all your diamonds down onto your Gold n Diamond layer
Give your female tube a drop shadow of V-4, H-4, Opacity 40, Blur-4
Duplicate your female tube
Activate the bottom one
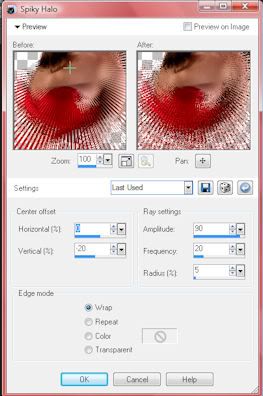
Effects - Distortion Effects - spikey halo and use these settings
Duplicate this layer
Image - free rotate - Direction - Left. Degrees - 90 and make sure the box Rotate single layer around canvas center
is checked
Merge your 2 distortion layers down onto each other
Close off your Gold n Diamonds and Rose corners then merge all layers down onto each other
You should now have 3 layers..1. Your Gold n Diamonds, 2. Your Roses and your frame, woman etc.
Duplicate your rose corners x2 so that you have 3 total
Activate your top rose layer
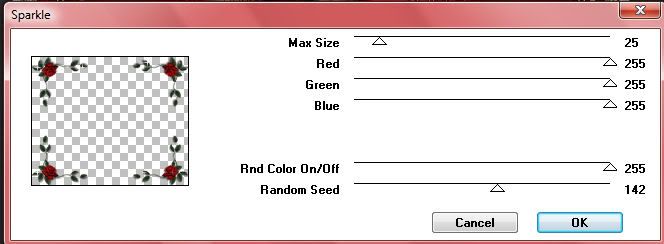
Effects - Plugins - VM Natural - Sparkle
Use these settings
Activate your middle rose corner layer
Repeat the above step but move the random speed to 153
Repeat the above step but change the random speed to 163
Duplicate your female layer x2 so that you have 3 layers and move one layer up under
one rose corner layer
Duplicate your Gold n Diamond x2
Activate your top layer
Effects - DSB Flux - Bright Noise and use these settings
Direction - Mix
Click OK
Repeat this step for each Gold n Diamond layer
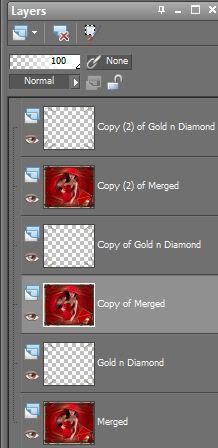
Your layers now should look like this
Merge each Gold n Diamond layer down onto the red layer, so that you have 3 layers in all
Make sure you put your water mark on your design
Before you take it to Animation
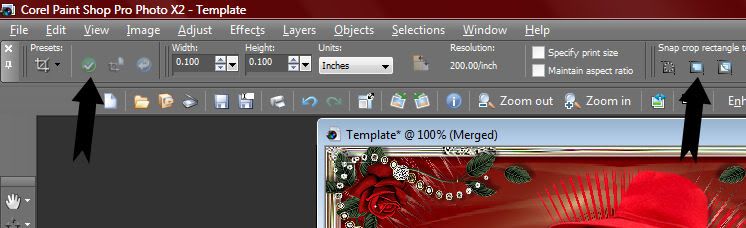
Activate your Crop tool , up at the top select the " Snap crop rectangle to" and click the middle one
see image below, then click the green check mark at the far left.
Activate your bottom layer
Edit - copy
Take to animation
Edit - paste as new animation
Back to psp
Activate middle layer
Edit - copy
Back to animation
Edit - paste - after current frame
Back to psp
Activate top layer
Back to animation
Edit - paste - after current frame
View your design, if you're happy with it, Save as gif
I am using the beautiful artwork by Elias Chatzoudis called HocusPocus
You Can Find It Here
Halloween Supplies Here
Scrap kit called Halloween 2010 You Can Find It Here
Copy template into PSP
You can put anything you want on the signs
Copy - paste FM-Halloween element-76 and resize to 30% and move to the bottom rght
Give it a drop shadow of V-3, H-3, Opacity-30, Blur-3
Copy - paste Cauldron element 62 and resize to 30% and move to the bottom left
Give it a drop shadow of V -3, H -3, Opacity-30, Blur-3
Copy - paste Element 1 and resize 30% and move to where it hangs off the top part of the frame
Effects - edge effects - enhance
Copy - paste Element-40 and resize to 30% and move to the left side of the frame
Effects - edge effects - enhance
Copy - paste your tube and resize to 96%
Image - mirror
Now is the time to put the artist watermark on your design and yours
Merge all your layers down
We can now take it to animation if you want
Copy - paste as new animatiom and duplicate x3 so that you have 4 frames
Copy - paste your bubbles into your Animation Shop
Activate your bubbles
Edit - select all
Edit - copy
Now activate your design
Edit - select all
Edit - paste into selected frame and place the bubbles on the left hand of the cauldron
repeat
Activate your bubbles
Edit - select all
Edit - copy
Now activate your design
Edit - select all
Edit - paste into selected frame and place the bubbles on the left in the cauldron
Save as gif
I am using the beautiful artwork of Jose Cano-Cowgirl, You can find his artwork Here
Supplies Here
Open up your " Country Girl Template" in Aniamation Shop
Click on the first frame
Edit - Copy
Go to PSP
Edit - paste as new layer ( this is a little trick i use )
Copy - paste your tube layer 1 of your Cano tube, resize to 90% and move over the the right like shown below
Copy - paste the wheat and move the the left like shown at the top
Copy - paste your cactus and move to the bottom left
Copy - paste the wheat and move the the left, make sure your cactus layer is above your wheat layer
Give your cactus a drop shadow using these settings, V-3, H-3, Opacity-41, Blur-4, Color-black
Copy - paste your rocks and move to the lower left...make sure this layer is above the cactus layer
Copy - paste your post and move towards the bottom
Make sure you have the artist watermark and yours
Close off your bottom layer that has the horse and then merge all other layers down upon each other
Edit - copy
Take to animation
Edit - paste as new animation
Duplicate x3 so that you have 4 frames like the Country Girl template
Edit - select all
Edit - copy
Activate your Country Girl Template and go to
Edit - select all
Edit -paste into selected frame
View your design and make sure you're happy with it
If you get confused just go by the main image at the top


